Divi WordPress success has been proven by the 2.5 million websites it has created worldwide.
The advanced visual builder takes WordPress to a new level, allowing you to create stunning websites with no coding experience.
This comprehensive guide will walk you step-by-step through the process of building a Divi site.
We’ll teach you everything from setting up your WordPress website to creating custom layouts.
Let’s get started!
Step 1: Purchase a domain and web hosting
The first step in building a website is to choose a domain and web host. This is the most basic, yet first step in starting the journey the right way.
Choose a domain name that is memorable and relevant. In contrast, web hosting involves the storage of your website files on a computer. Choose a provider that is reliable based on what you need. The domain is registered through a domain registrar. Hosting is set up and the DNS configuration connects the domain with the hosting. That’s it!
Namecheap is our recommended domain registrar for Divi users. Hostinger is our top choice for Divi websites, as it offers global data centers and a website that runs faster.
Note: Secure your website with SSL (Secure Sockets Layers). Google Chrome, and other popular browsers, may label your website as insecure if it does not have HTTPS. Hostinger offers a simple way to obtain an SSL certificate, ensuring a secure and safe browsing experience for life.
Step 2: Install WordPress
After we have finished with the domain name and hosting, now it is time to install WordPress. The majority of hosting providers provide a WordPress installation that can be done in one click. In your hosting control panel, look for options such as “Install WordPress” and “WordPress Installer”.
Set up a username and password for the admin and other basic settings.
You can manually install WordPress if your hosting service does not offer a one-click option.
- Download the WordPress.org installation file by visiting WordPress.org.
- Download the file, unzip it and save it locally.
- Upload the files using your host’s FTP client or file manager.
- Create a database on your WordPress site using the database management tool provided by your host.
- Create a WordPress configuration file.
- Follow the instructions on the screen to install WordPress.
Step 3: Configure WordPress settings
WordPress settings are crucial in determining the way your website looks and functions. These settings affect many aspects of your website, such as its title, URL structure and comments.
Log in to your WordPress dashboard and navigate to Settings. Make changes, then save. The following is a list of all the settings that you must configure in WordPress.
General Settings
- Site title:Enter your website’s name, which will be displayed in the browser tabs and results of search engines.
- Tagline Provide visitors with an overview of your website by adding a short description or slogan.
- WordPress Site Address (URL), and WordPress Address (URL).Specify your WordPress website’s URLs, making sure they are accessible and accurate.
- Email address for Administration:Enter your email address that is used to administer the system, including notifications and user management.
- Membership:Configure the settings related to registration options and membership options for users, if applicable.
- New user default role: Select the default role that is assigned to new users at registration.
- Site language:Set your site’s language to ensure that your audience can easily access it.
- Timezone : Select your site’s local time zone to ensure post scheduling and timestamps accuracy.
- Date Format: Select the format to display dates and times on your website.
- Week starts on:Select a day to start the week when using calendar-related and date-related features.
Write Settings:
- Select Default Category for New Posts: Select a default category to be used when posting new content.
- Default Posting Format: Select the default post format, such as gallery, video, or standard.
- Post by Email: Configure the settings for posting content via email.
- Update Service:Enter ping services that will notify you when new content is published, increasing visibility.
Read Settings
- Front page displays:Choose if your homepage displays the latest posts or static pages.
- Blog pages show at most: Set a maximum number of posts per page to optimize site performance.
- RSS Feeds: Configure RSS feed settings to allow users to easily subscribe to your content.
- Include the following for each blog post: Select between the full text and summary in RSS feeds.
- Control search engine visibility: Control whether search engines index your site.
Discussion Settings
- Default Posting Settings:Specify the default settings for comments, trackbacks and other interactions with your content.
- Other comment settings: Configure settings related moderation of comments and notifications for managing user engagement.
- Email me whenever: Select whether you want to receive emails for certain events related to comments and keep informed of user activity.
- Before the comment appears:Control if comments require manual approval before they are visible in order to prevent spam.
- Comment Moderating: Define criteria to automatically hold comments for review based on factors such as the number of hyperlinks or specific words that indicate potential spam.
- Disallowed comment keys:Enter words or phrases to trigger automatic comment moderation.
- Avatars Determine whether or not to display avatars for comments, and the default avatar image when users do not have a custom picture.
Media Settings
- Image sizes: Set the dimensions for thumbnails, medium images, and large pictures, optimizing their display on your website.
- Uploading files: Configure settings to organize uploaded files and ensure efficient media management.
Permalinks settings:
- Common settings: Choose a permalink for your website URLs to optimize SEO and user friendliness.
- Customize URL structure by using custom settings.
Privacy Settings
- Privacy Policies Page: Select a page that contains the privacy policies of your website, to ensure compliance with data protection laws.
Install Divi Theme for WordPress
It’s now time to configure Divi. Divi is a premium Elegant Themes theme, which requires a purchase. Here are some things you can do.
Then, pay for the Divi theme. Follow the below instructions to navigate to your WordPress Dashboard.
- Click on Appearance > Themes.
- Click “Add New”, then “Upload Theme.”
- Click “Install Now” after selecting the Divi Theme ZIP.
- Click “Activate” after successful installation to make Divi active.
The API key from Elegant Themes must be used to authenticate the Divi theme in WordPress Dashboard > Divi Theme Options > Updates. Enter the key and click “Save changes” to gain access to updates and support.
Note: The theme will automatically be installed if you are using a Divi partner hosting account. The process outlined is sufficient for external hosting.
Step 5: Configure the Divi WordPress Theme
The default Divi theme will be displayed on your website’s front-end after installing and activating Divi. We need to perform some important tasks before we can continue.
Divi Theme Options Configuration
Divi Theme Options contains 8 settings that you can use to customize your website. Here’s a breakdown of the 8 options available:
- GeneralUnder General, you can find essentials such as logos, color palettes, and social media buttons, as well customization options like sidebar layouts and Google Fonts. You can also optimize your site’s speed with CSS and Javascript.
- Navigation: In navigation, there are three main subcategories. Pages and categories have similar settings, such as showing or hiding dropdowns, displaying the home page link and more. The general setting will ask for your opinion about the link to the top-tier of the dropdown menu.
- Builder There are two tabs in the builder section, including Posts Type Integration and Advanced settings.
- LayoutThis category has 3 sub-tabs that are used to determine the layout of your page.
- Ads :This is the category for you if want to display advertisements on your website and change settings.
- SEOIt is all about the page SEO. How you handle the index, single, and homage page.
- Incorporation: This tab allows for code customization.
- Update Basic updates such as username, API and version rollback are easy to configure.
Global Settings
The Divi theme has global settings such as color, font, header and footer. You can create consistency in the design of future posts and pages by configuring these settings.
- Color:Divi’s color management system ranks among the best in WordPress. Divi’s magic colour system allows you to create and edit saved, global and recent color palettes, based on the user interaction. This simplifies color selection and ensures consistency across your website design.
Follow these simple steps to set global color.
- You can access Divi Theme options by going to WordPress dashboard > Divi.
- Choose eight colors from the “Color Pickers Default Palette”.
- Typography Within the typography panel you can adjust the default text look site-wide. This includes adjusting font sizes and styles, color, line heights and letter spacing.
Follow these simple steps to configure global Typography in Divi.
- Click on Appearance in the WordPress dashboard.
- Select General Settings and then Typography.
- Select fonts and font sizes for each section, such as the header or body.
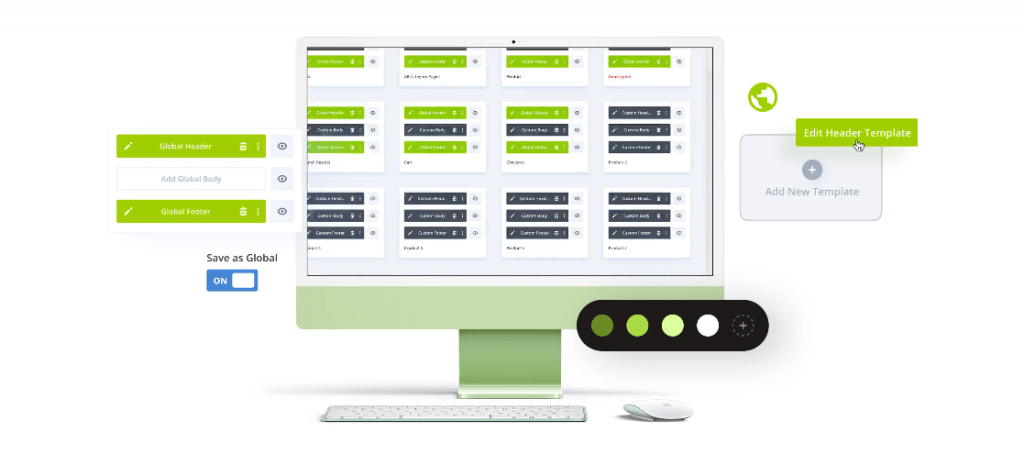
Header and footer Design
Divi Theme Builder revolutionizes web design by adding global headers and feeters dynamically to posts and pages. The Divi Builder allows you to create a header or footer and then apply it across the entire Divi website.
How to create a global header
- Access Dashboard > Divi Theme Builder > Add Global header.
- Here you will see two options: Add from the Library and Build a global heading.
- Insert multiple rows for optimal menu design.
- Add an “Images” module to upload your logo.
- Insert the “Menu Module” and choose a menu, or create one.
- You can also customize the header by using the module settings. You can change the color of the text and the background, as well as the hover effect.
Create a Global Footer
- Navigate to Dashboard, Divi > Theme Builder, Add Global Footer and then Build Global Footer.
- Add rows and modules as required, such as social icons, links, terms and signup forms.
Step 6: Create essential pages and menu
It’s time to map out the flow of your website. Start with page creation.
- Navigate to Divi on the left side of the WordPress dashboard. Select Theme Options by hovering over the Divi section.
- Select Pages from the menu on the left. Choose Add New. You can also use the admin bar located at the top.
- Click on Page after hovering over “+ New”.
- Start with the home page. Click “Publish” after entering the title.
- Repeat this process for every new page that you wish to add. Create pages like About Us, Services and Blog.
You can then customize and style your website.
The final step before we are done is to create a menu or navigation for the Primary Header. To do so,
- Hover over the Appearance tab on the WordPress dashboard. Select “Menus” and then click on it.
- In the menu name box, type your desired menu title.
- Click on the “Create Menu button”. You’ll see options on the left side to add different types of pages, custom links, or posts.
- To view all pages created, click on the “Pages tab.” Click “Add to Menu” to add the pages you want.
- Check the “Primary Menu”, or “Secondary Menu”, depending on the type of menu you are using. Click “Save Menu.”
- Select the “Footer Menu”, in the same way, when creating a menu to be displayed at the bottom of your website.
Step 7: Create Your website using Divi WordPress Theme Builder
Let’s now explore how to build a website with the Divi theme. Divi has two main methods of building a website:
- Method 2:Build a page with Divi.
- Method 2. Design a page based on a Divi layout.
Design your Home Page
Imagine you’re asked to design an agency layout using Divi. The homepage of such a layout typically contains essential sections, like the hero and testimonials. Each section should be carefully designed with important details and descriptions in order to showcase the agency’s achievements and customer satisfaction.
Start by navigating to Dashboard > Pages All Pages > Home > Editor with Divi.
Let’s dive into the comprehensive guide for creating an agency layout that is impactful using Divi.
Step one: Designing the Hero Section
Start by creating a hero section with a compelling headline, subheadline and CTA button.
Select a color for the background that matches your brand.
Create two rows in the hero section.
- Use the Heading, Text, and Button Modules to create a headline and subheadline that grabs attention.
Divi’s default heading and text modules lack customization options.
- Insert an image module in the second row to showcase your agency’s unique visual identity.
Step two: Creating the About Us Section
Focus on the “About Us” segment after the hero section to introduce your agency.
Add two rows and change the background color of the section:
- Insert an image module in the first row to visually represent your company.
- Use the text and heading modules in the second row to highlight the key elements of your agency’s narrative.
Step 3: Showcase Services
Create a section called ‘Our Services,’ to describe the services offered by your agency.
Add a section that has a color background aligned with the previous section.
Add a 3-row in 2 columns to visualize 6 different services
- Use the blurb modules on the first row of the page to describe the service that you offer.
- Repeat this process for all the rows.
Step Four: Displaying Testimonials
Showcase customer testimonials to enhance your agency’s credibility. Set this section apart by using a different background color.
- Insert the blurb module with a title and a new row in a section.
- Then, insert the slider. Use its advanced content elements to design and add testimonials.
Step Five: Highlighting Portfolio
Portfolios are a great way to show off your agency’s expertise and high-quality work.
Create a section called ‘Portfolio,’ with the same background color as the service section.
- Use the blurb module in the first row of the header to present it.
- Add multiple rows to the Gallery module and insert it to effectively display your portfolio.
Step 6: Contact Us section
Incorporating a section called ‘Contact Us,’ will facilitate communication with your customers.
Add a new section, with a color background that matches the previous sections.
Add two rows.
- The first row of the page will have the contact information, and the second row contains the essential information about the agency.
- Use the Contact Form module on the first row of the Contact Forms to create a form that includes an input field and a button for submission.
- Use the Blurb Module in the second column to provide a concise summary of your contact information.
Click the “Save”button after adding all content to preserve your layout. You can also preview it for a seamless experience. That’s it.
Design Other Essential Pages
A website for an Agency includes pages such as the About Us, Services, Portfolio, Blog and Contact Us. You can design each page separately using the dashboard’s Page option.
Here is a breakdown on how to design these essential pages.
- About Us:For your About Us page, you can include sections that detail the history of your website, its team, its mission and more. Use Divi modules like Image, Text and Blurb to tell a compelling story.
- Services Page:On your Services page, you should provide detailed information about the products and services that you offer. Use modules such as Image, Text and Blurb to showcase your services.
- Portfolio Page:The portfolio page displays your agency’s previous projects and achievements. Showcase your best work visually and in a well-organized manner to show your abilities to potential clients.
- Blog Pages:The blog page will feature your articles or posts in chronological order. Use the blog module to organize and style your content. Create a row and section.
- Contact Us: This page gives visitors essential contact information as well as a way to reach your agency. Include a form for visitors to contact you, as well as a phone number, an email address and a physical address.
Save your work when you add rows, sections and modules according to your design requirements.
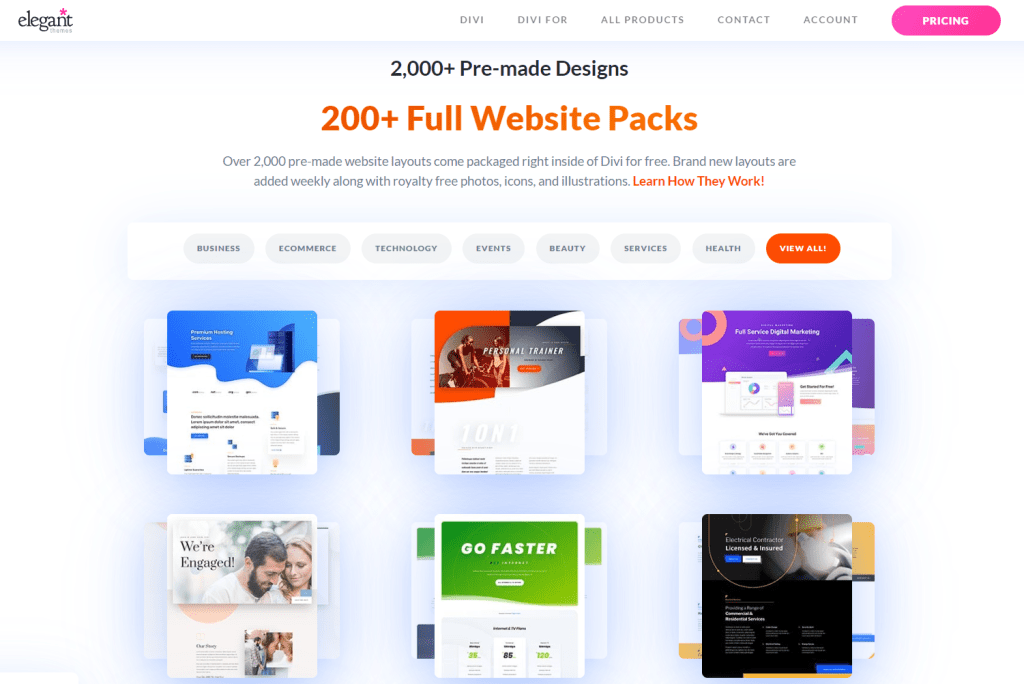
Create a page using a Divi WordPress Layout
Divi’s pre-made layouts are a great way to quickly and easily create beautiful web pages. Divi offers a variety of professionally designed layouts which can be customized to meet your needs.
You have multiple ways to use a Layout. Choose a layout from Divi’s library, or import one of our previously created pages.
Follow these instructions after completing the initial steps to add a design to your homepage.
Download a free Divi WordPress layout pack:
- Start by adding a page to your WordPress website. Use the Homepage that is already there. Navigate to WordPress Dashboard > Pages, then click on Homepage.
- Choose “Choose A Premade layout” or “Browse” from the three displayed options. You can browse and choose from pre-designed Divi Layouts.
- You can search for your desired layout using the filtering options in the sidebar. Click it and then click “Use This layout” to load the layout onto the page.
- Divi Visual Builder allows you to customize the layout to suit your needs. Click the “Save” button once you are satisfied with your changes.
Import layout packs from external sources:
Divi allows you to import a page layout two ways: through the Divi library or from an existing page.
Divi Library:
- Navigate to Divi Library in your WordPress dashboard.
- Click “Import & Export”, located at the top-left side.
- Select “Import”, and then select the layout file that you have downloaded.
- To complete the importation process, click “Import Divi Build Layouts”. The layout should now be visible in the Divi library.
- Click “Edit with Divi” on any page to use the imported layout.
- Choose “Choose A Premade layout” or “Browse” Layouts from the displayed options.
- Click on “Your saved Layouts” to import the layout.
By using an existing page
- Navigate to your WordPress dashboard, and click Pages > Homepage > edit.
- Click “Edit with The Divi Builder” then select “Build from Scratch.”
- Click on “Portability” after scrolling down to the bottom round setting.
- Upload the layout file that you have downloaded by selecting the Import option.
- Upload the layout by clicking on “Import Divi Build Layout”.
- Check the “Replace Existing content” option before importing.
Customize the other pages as necessary to reflect your business or brand.
Final Thoughts
This guide will walk you through the process of creating a Divi WordPress website, from the initial setup to the design and use of Divi’s powerful tools like Theme Builder and the Visual Builder.
Divi gives you the flexibility and tools to customize your website according to your brand and needs.
What type of website do you want to create? We would love to know if you prefer starting from scratch, using a template or a pre-made layout. Please share your experience in the comments section below.
For more information, go to our homepage